Pages

Camping In Images

Friday, June 27, 2014

Hello!

A couple of weekends ago my family and I went camping near Lake Tahoe. The kids had a blast which translates to a successful weekend!  I'd like to point out that every good camping starts out with an iced vanilla latte. It kept this mom sane! ;-)


Thanks for stopping by!

--Carolina 


Zocalo's

Sunday, June 22, 2014

Hello There!

A couple of weeks ago we stopped at Zocalo Coffeehouse on Bancroft in San Leandro.  Imagine my surprise when I saw that a parking meter in front of Zocalo's had been yarn bombed.  LOVE!


Until next time!
--Carolina

Three Fs: Family, Friends, and Food

Monday, June 16, 2014

Hello!

Memorial weekend was a fun filled weekend full of family and friend gathering madness. It was pretty awesome.  My SIL made street tacos with homemade corn tortillas in the back yard.  They smelled so tasty.  Take a look:


The following day we met up with some friends for a barbecue dinner.  Nothing better than great company, equally great conversation, and delicious food. 


Thanks for stopping by!

Best Wishes, 
Carolina 

My Baby Turned 3!

Friday, June 13, 2014

Hello,

I know I am going to sound like everybody's mother out there.  But seriously folks, where does the time go?!  It used to be that I measured the passing of time by my own personal accomplishments but now that I am a mom I find myself measuring the passing of time by my kids' accomplishments ('cause let's face it, whether we want to admit it or not, their accomplishments are ours as well, right?) and their birthdays.

My youngest turned three in March but we had just gotten back from Hawaii and I had other commitments that I wasn't able to fully dedicate the time to bring to light what I had in my mind for his birthday. On his actual birthday we had cake and balloons and he was happy with that. Until his balloons escaped his grasp and went to balloon heaven. My poor child let out a howl of angst so intense I thought he had severed a limb!  Thankfully it was only a cluster of balloons and Operation Balloon Replacement quickly commenced.  We drove to the nearest Safeway and got more  birthday balloons.  The things we do for our birthday kids! :-)

We celebrated his birthday this past Memorial weekend with a What Does The Fox Say? theme.
I made some t-shirts for my two boys and my two nephews.  I used the wax paper method. I didn't get the right paint and the paint ended up adhering to the piece of cardboard paper I used to line the t-shirt so that when the paint dried- yep, you guessed it- it was totally stuck to the t-shirt. Poor kids ended up wearing the t-shirts and scratching their chests all afternoon due to the pieces of paper stuck to the back of the fox.  Still, they looked cute.  :-)

I designed the water bottle labels, posters, soda bottle labels, and cupcake toppers. Geometric shapes and foxes?  YES please!  I found the fox clip art from etsy seller FRANCEillustration.  She has such beautiful digital art.

Like every party I seem to be involved in, this party was a major budget party.  It was small-- just family and a few friends.  I made some fox tails a la Crazy Wonderful style.  My sis and I cut these out of craft felt the night before and we sewed them up the morning of the party. I added some bias tape I had on hand so the kids could tie them around their waists.

I cut and sewed the geo garlands the day before.  I followed this tissue paper geometric lantern tutorial  by Jenny of Hank & Hunt (who is sadly no longer blogging).They are not difficult to make but are fragile and require a bit of patience.  Well worth the effort, though.
We played some games: Musical Paws (i.e.: musical chairs without the chairs), Find The Fox (kids had to find little fox pins placed around the back yard), and Pin The Tail On The Fox.  Then the kids simply ran wild from all the sugar they had consumed that was tempered by pizza. Sorry parents but thanks for joining in the fun!


I made a fox piñata from a cute burro piñata from Target.  I made his ears and legs smaller by cutting the tips off. I then fashioned a fox tail and stapled it to the body of the piñata. I cut some orange, white, and black tissue paper, fringed, and glued it on the piñata. Geo Fox was born!  He turned out quite cute.
The beautiful cupcakes and mini cake were made by my talented friend Judy.  I don't think there is anything under the sun that she cannot bake. She also makes the most delicious coconut tres leches cake that is topped with fresh strawberries and toasted coconut flakes.  So divine!  These cupcakes and mini cake were no exception. They were strawberry cake with strawberry buttercream frosting. Well worth the caloric intake!
I'll end with this typical image of my boys because this is how they usually are. Unless they are bickering. :-)
Thanks for stopping by!

Best Wishes,
Carolina


Pinkie, The Gilded Bad Boy

Tuesday, June 10, 2014

Hey there!

Glad you made it back here. :-)

I promised I would have a tutorial of sorts for the gold fringed piñata my friend nicknamed Pinkey. I'm not quite sure how she came up with that name but we are running with it!

Pinkey was found at Target in this fun state:


Pretty cute but he didn't quite fit in with the party decor of pink and peach.  I thought I could transform him into something a little grander than his current state.  It was time for a makeover!  I considered re-fringe-ing (yeah, totally made it up) this little guy in alternating pink and peach stripes or in a bunch of mini tissue paper flowers. But then I came across this project on Pinterest by Studio DIY for this awesome gilded piñata!  I kid you not, the angels sang and the sun came out.  It is that amazing!

I deviated from her tutorial somewhat.  I don't like to use spray paint.  I am such a klutz I'd most likely end up spraying myself in the eye which would lead to a visit to the emergency room costing me lots in insurance co-payments and lost time. So to make my life easier and ease my overactive imagination, I decided to use gold tissue paper and simply re-fringe this little guy.

Here he is in his nude stage:
Make sure you have the following supplies in hand:

Fringe scissors
Tissue paper
Glue (I swear by Tacky Glue)

I simply cut along the fold lines on the tissue paper and cut those in half then fringed.  Make sure that you have enough to finish the project otherwise you'll have to pause to cut some more. But if you're like me, that just means you get to watch another episode of Scandal while you fringe some more tissue.  ;-)

Make sure the fringe is long enough. You'll end up glueing the top portion of the fringe right above the previously placed fringe.  I regret I didn't take more detailed photos but I was in the flow and didn't think to photograph for a full tutorial.

Here is Pinkey in his new outfit:

Isn't he so adorable!  LOVE!

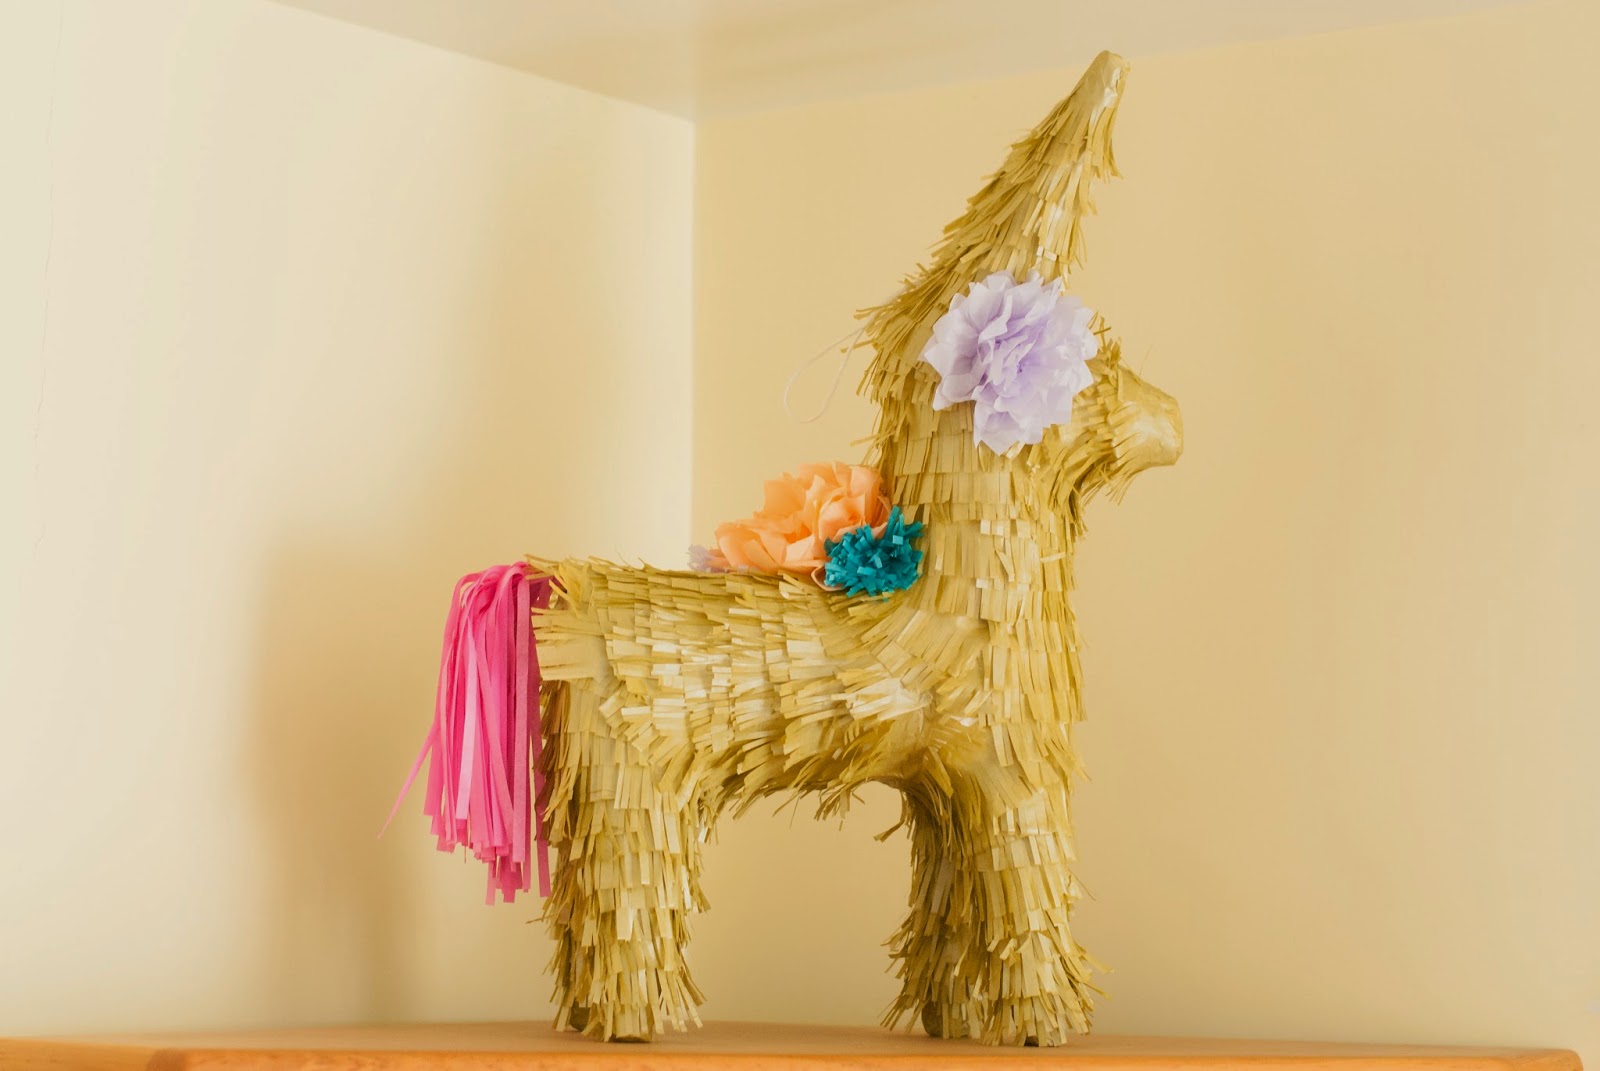
Here he is in all his gilded glory with flowers and a tassel tail:

And another view up high and away from curious little hands:


He is so cute isn't he?!  I fell in love with this little guy and briefly considered keeping him for myself. But sanity prevailed and Pinkey is in his new home where he is appreciated and left alone and not bothered by little hands curious to know whether he is full of candy or not.  Had he stayed in my home he surely would not have survived a week!

Thanks for checking in!
--Carolina

Sweet Communion Party Sources

Sunday, June 8, 2014

Greetings,
I've found a few minutes so I can get this post out of my head! Who knew maintaining a blog that only a few people read (my husband and I count, right?) would be difficult?  Not because I don't want to, quite the contrary! But because my time is so limited and I haven't quite found the perfect balance between working full time, being a mom and wife, and feeding my need to be creative. If anyone out there has some advice on how to effectively deal with Mama Guilt, please let me know!

A couple of weeks ago I posted a Sweet Communion Party my friend Adris let me decorate.  As I mentioned before the budget was quite small and I wanted to keep decor costs down as much as possible. My go-to decor item is paper. In this case, the whole party was decorated using tissue paper. Tissue paper is your friend, people!  You can find it almost anywhere and in so many colors.  Plus there's the added bonus of not having to feel guilty about spending money on something that can be recycled either as decor for another event down the line or as current whimsical decor for your home.  You can simply toss it in the recycle trash bin once your party is over and know that it will be recycled.

Without further ado, let me share a few more photos of the event and the sources.

I found the gold dot burlap at Jo-Ann Fabrics. I don't recall the exact price but I used a 40% off coupon & purchased the rest of the bolt. It was quite a substantial discount given the yardage purchased. The burlap was used as table runners.  E wrapped this small piece around a potted tulip.  So pretty.

The soda bottle labels are from Pinhole Press. I loved the final product! Most of the guests took one home as a favor.  The water bottle labels were designed and printed by me.


The gold tissue paper fringed letter A is from Michael's.   I used Tacky Glue to adhere the fringed tissue paper to the particle board letter.  I really like this glue. It dries quickly and is very thick so a little goes a long way. Michael's and Walmart carry this glue.


The cake pops are from Starbucks. I had plans to make them but didn't have enough time in the end. Thank goodness Starbucks had enough in stock!  :-)   They are finished off with gold and peach ribbon. 


The fans were made using this tutorial from Oh Happy Day.  They were quite tedious but well worth the effort. I deviated from the tutorial in that I did not use the cardboard piece recommended for hanging. We opted to hang these directly onto the wall with generic washi tape.  The small white fans are from Michael's found in the dollar section.   The papel picado used over the tables was made using the same method.  Again, quite a tedious to-do but so worth it for the wow factor.


The tissue paper flowers were made using this tutorial by Design Every Day. These are easy to make and make a statement when done in a good color combination.  The centers were made with  fringed gold tissue paper.


All the tissue paper used in the decor was purchased at Target.  Each color was a different quality of tissue paper. The light turquoise and white tissue paper was stiff and was so nice to work with as it held its shape well.  The peach and pink tissue paper was soft and pliable, almost like a fabric. It did not hold the folds nearly as well as the stiffer variety. Lesson learned:  is the stiffer the paper the better.

Thanks for checking in and be sure to check in later for the pictorial how-to of the gilded piñata.

Best Wishes,
Carolina